1) Navigate the extracted Eclipse software zip file showing in following screen shot (Download latest version of Eclipse here: http://www.eclipse.org/downloads/):
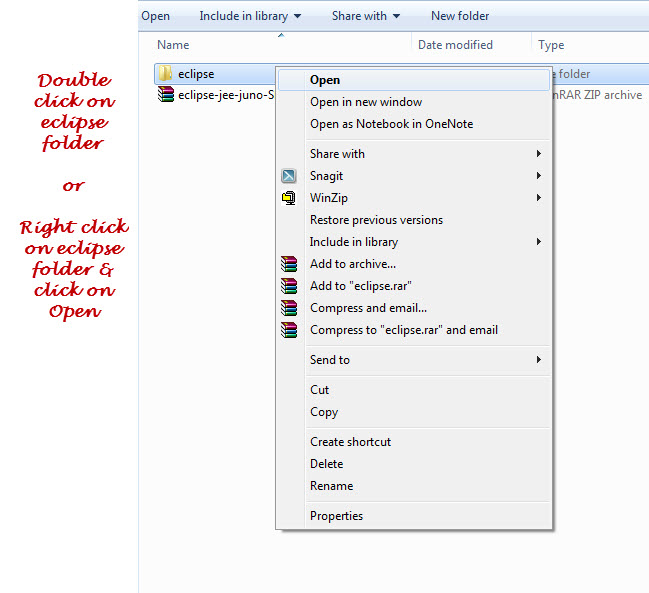
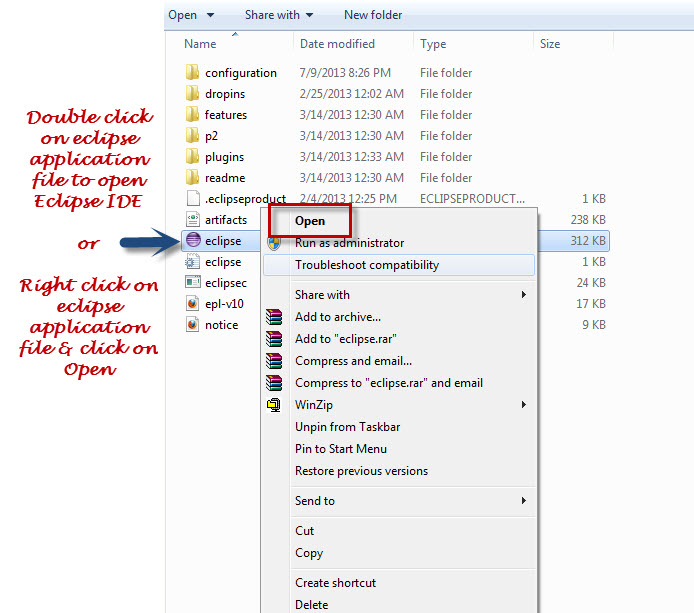
2) In the extracted Eclipse folder double click on the Eclipse Application file to launch the Eclipse application same as mention in the below screenshot:
Eclipse will take some time to launch the Eclipse welcome window, so wait for little time.
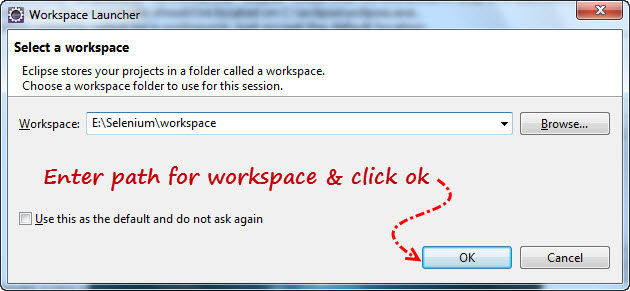
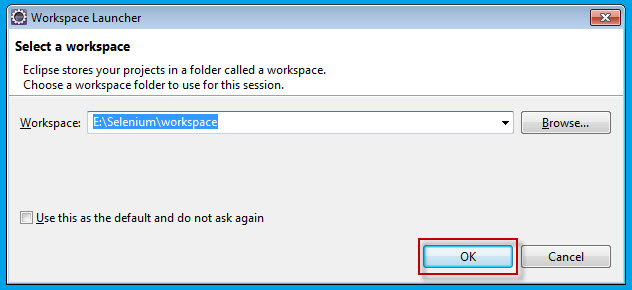
3) Eclipse will ask you to select the workspace, here you can select the path where you want to save Eclipse project. Once you enter the path click on OK button shown as mention below screen shot:
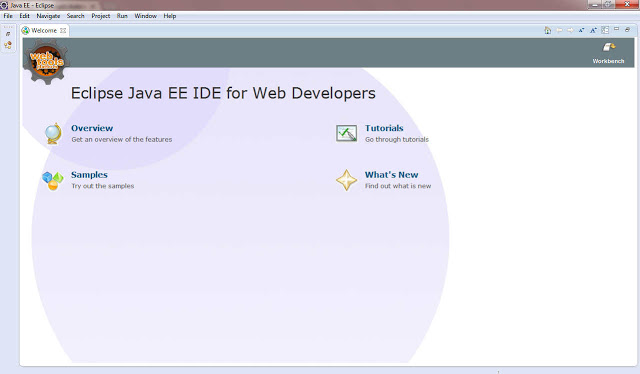
4) Eclipse will setup the workspace path & launch the Eclipse Welcome window first time as below, this means that eclipse ide is successfully installed on your machine.
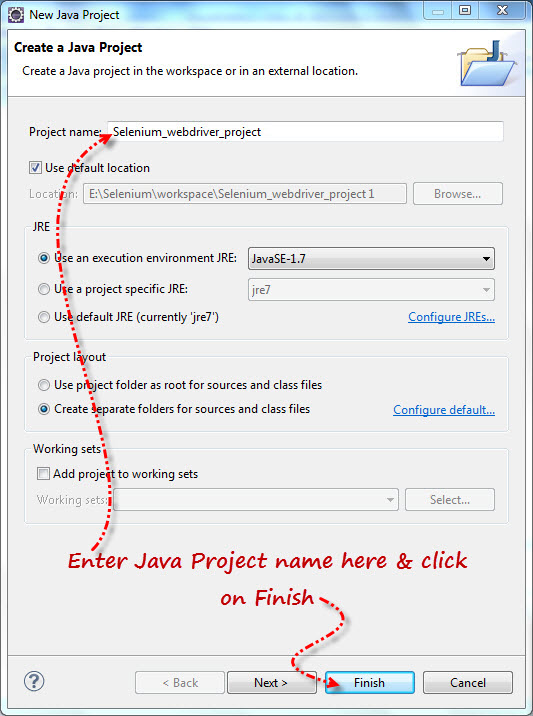
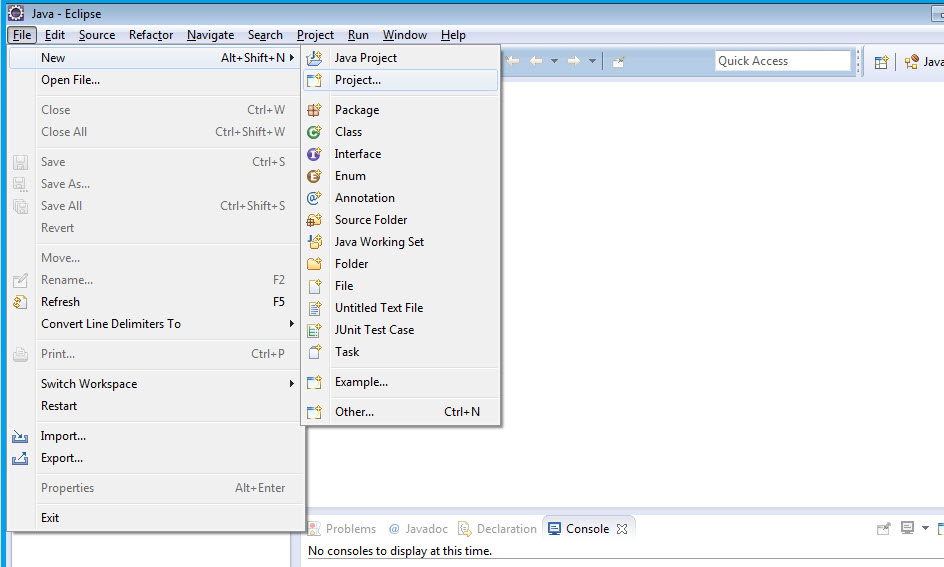
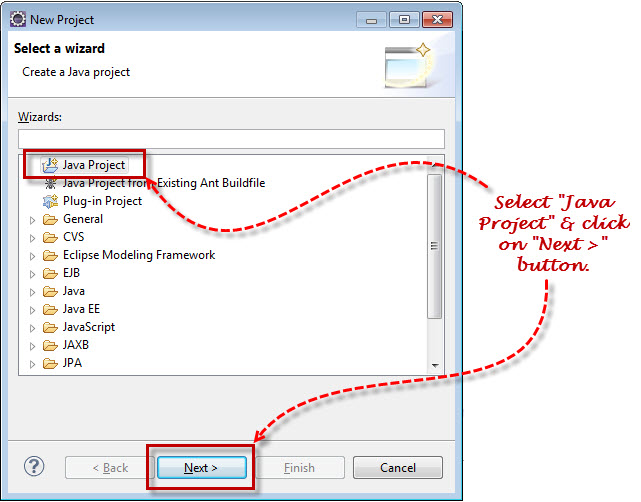
5) Go to File menu > New > Java Project.
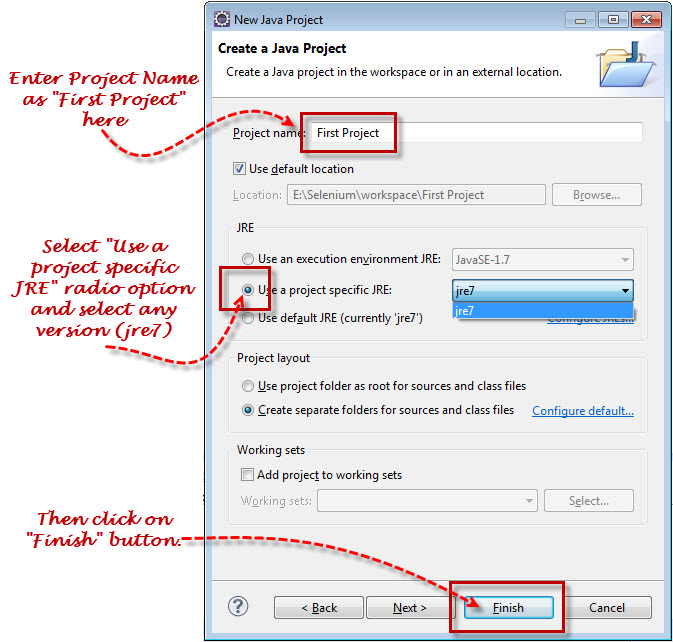
In New Java Project window under JRE section select “Use Project specific JRE” radio option & select any value from the JRE version (here I am selecting ‘jre7’). Everytime you have to select the JRE version based on the project.
7) In New Java Project dialog click on Finish button.
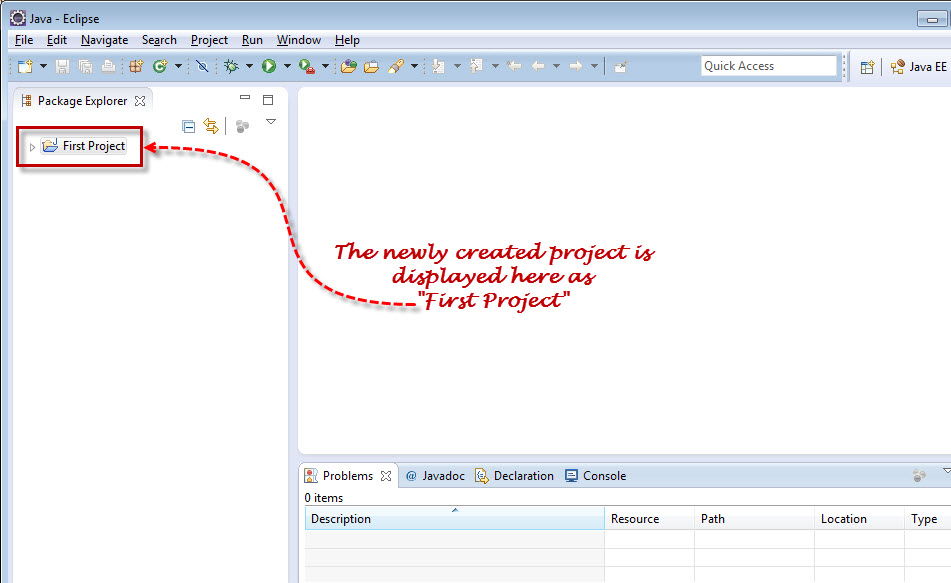
8) The new java project called “First Project” is created here & you can see the name of the project in the left section in the below screenshot:
Today we are going to see how we can record the test case using Selenium IDE & convert recorded script to Java WebDriver format & execute the automated test script using Eclipse. To start with you should have Eclipse, Java & Firefox installed on your machine. You can refer this article “
How to run your first Selenium WebDriver script” to set up your environment & ready to execute your first selenium testing tool tutorial.
A. Record a Test case using in Selenium IDE
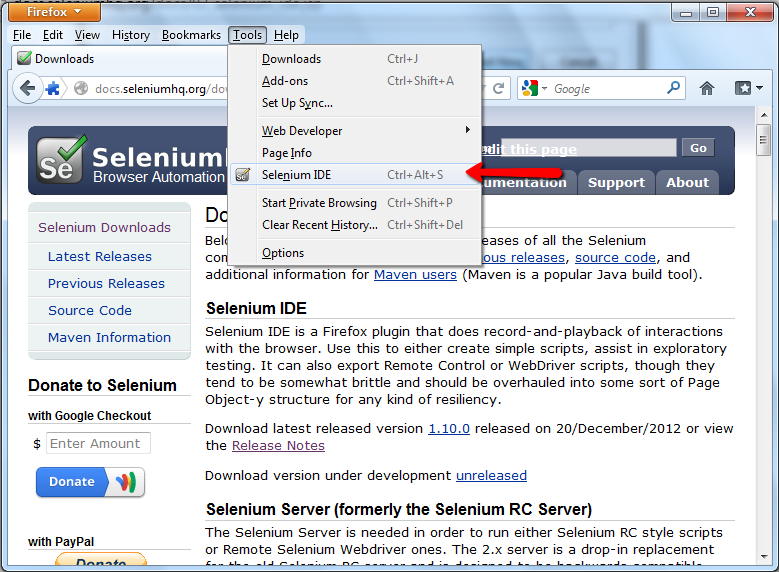
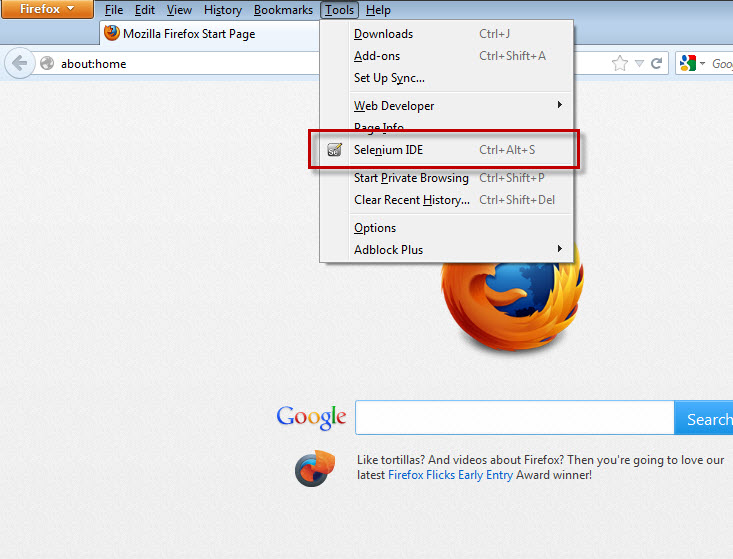
1) Launch FireFox & open to Selenium IDE by selecting “Tools > Selenium IDE” option.
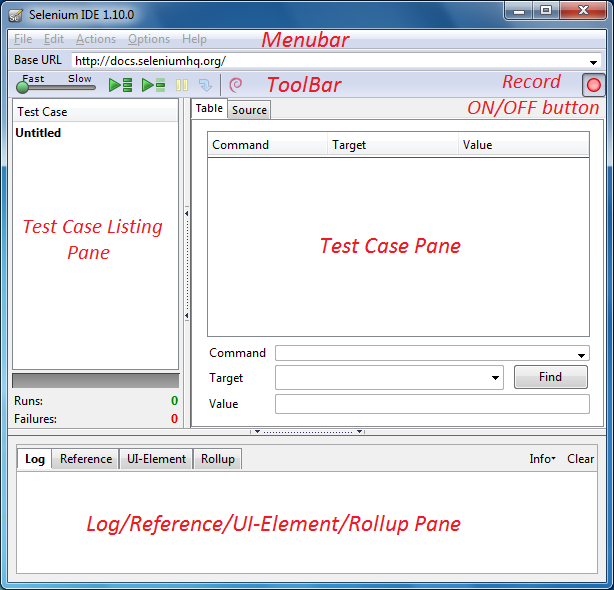
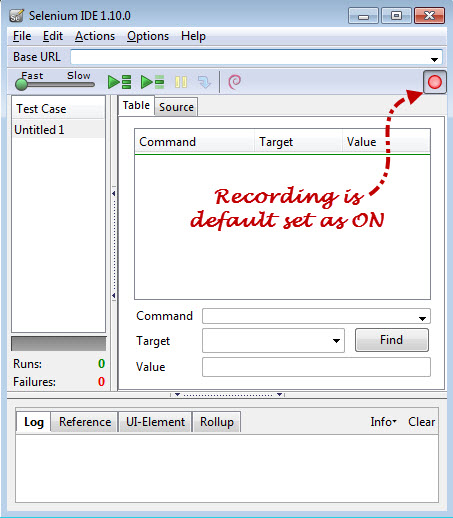
2) Make sure that Selenium IDE window is opened. In Selenium IDE the recording option is turned ON by-default.
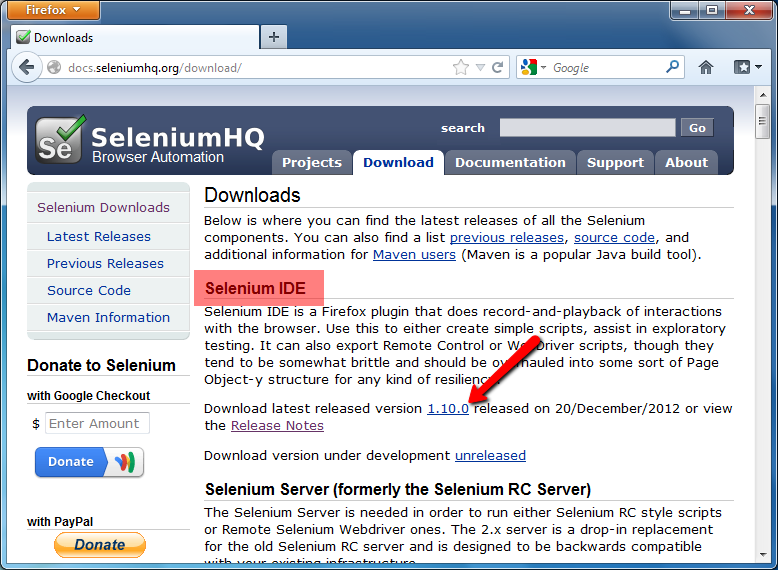
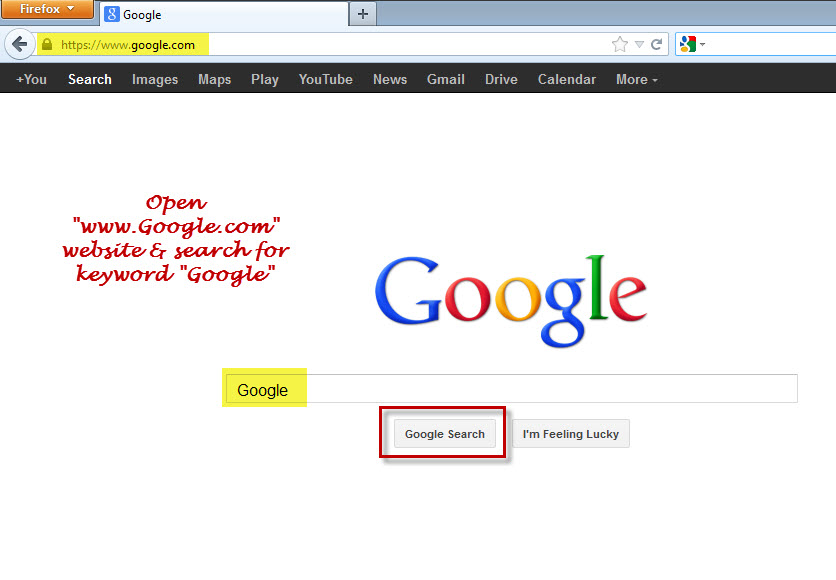
3) Launch FireFox browser & enter URL as
www.google.com same as shown below:
In Google Home page enter search keyword as Google and click on “
Google Search” button as shown below:
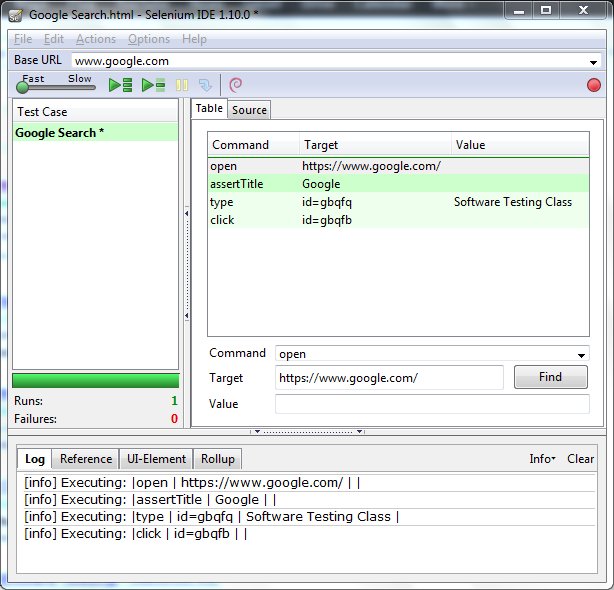
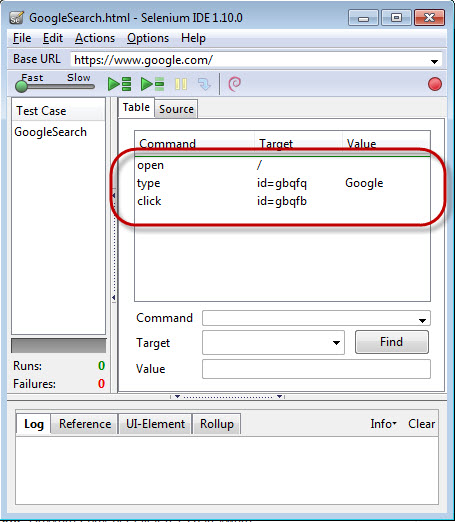
4) Once the recording is done, you will able to see the recorded command in the command section. Turn off the recording option same as mentioned below. Upto this point you have successfully recorded script in Selenium IDE.
B. “Enable Experimental Features” from Selenium IDE options
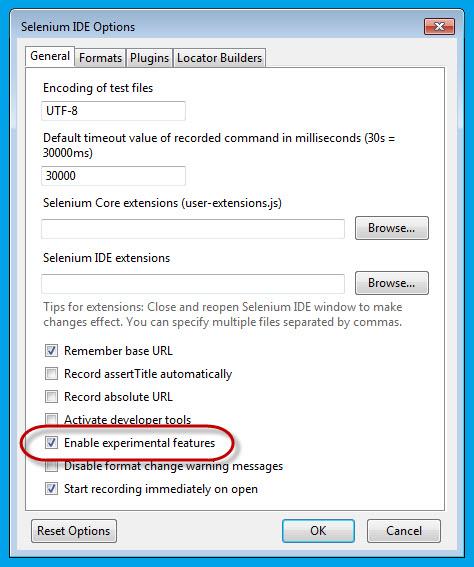
1) Navigate to Options > Options
In Selenium IDE option, select “Enable Experimental Features” check box.
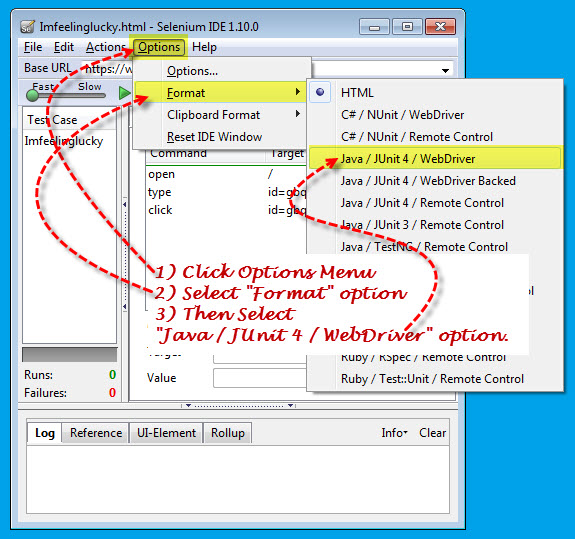
2) Navigate to Options > Format & select the “Java/ Junit 4 / WebDriver” option.
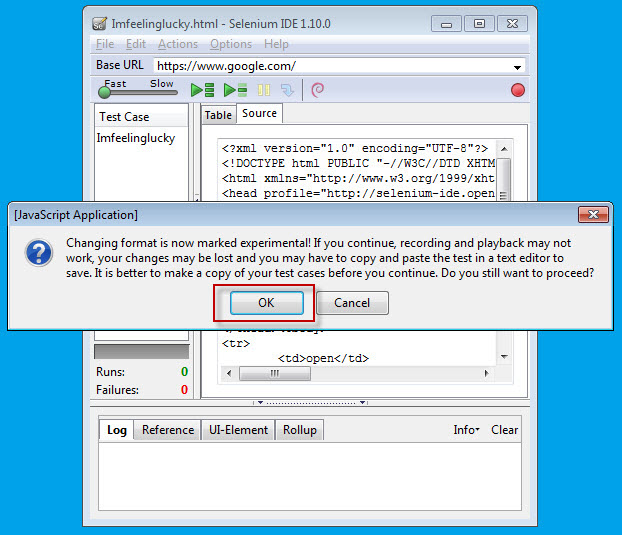
3) JavaScript Application dialog will be display. Click on OK button.
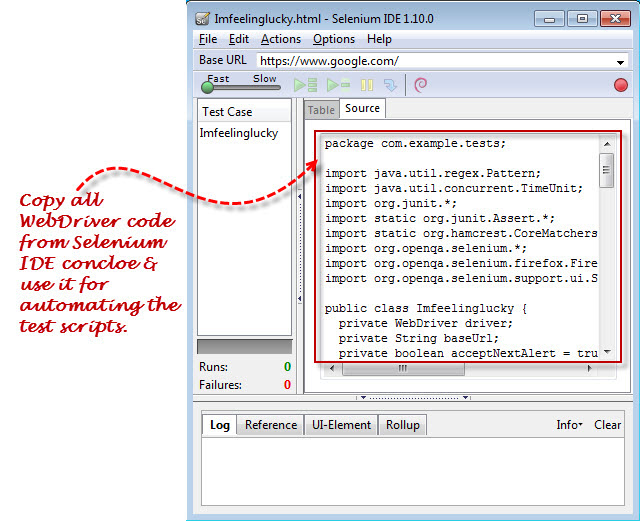
4) Now you will able to see the Java code is displayed in Selenium IDE – Source tab. This code will be used for creating Selenium WebDriver code.
C. Create “firstPackage” under Selenium WebDriver project
Launch Eclipse IDE & open same project created in above step.
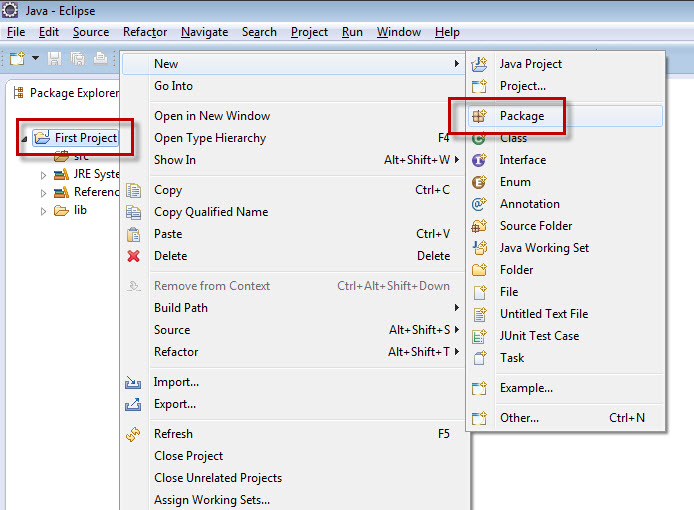
Right click on project name select option, New > Package.
2) In New Java Package dialog enter Name as “firstPackage”
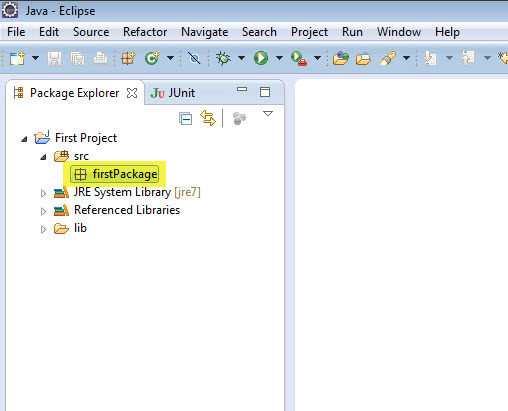
3) Once you created the first package, ensure that it is added under “src” folder same as below:
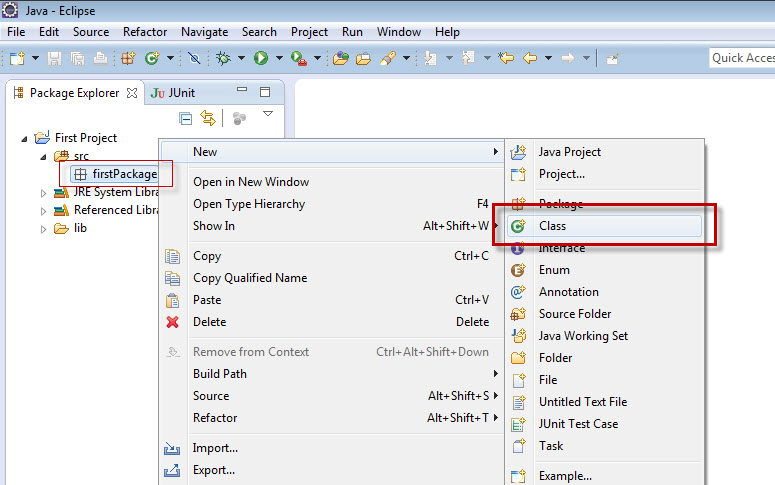
4) Right click on newly created package “firstPackage” select option, New > Class.
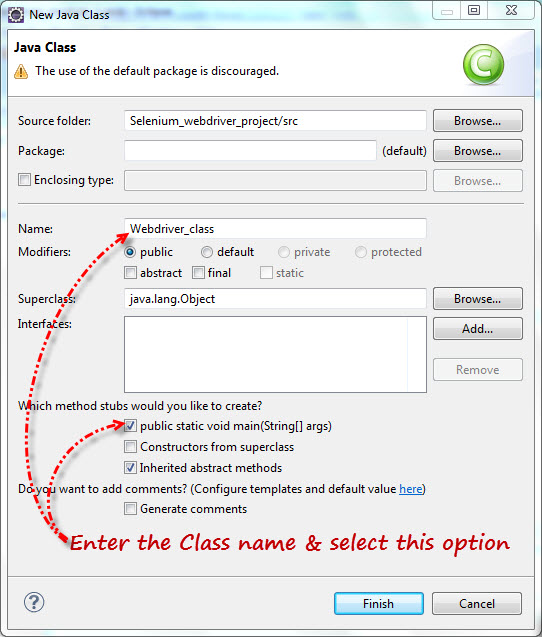
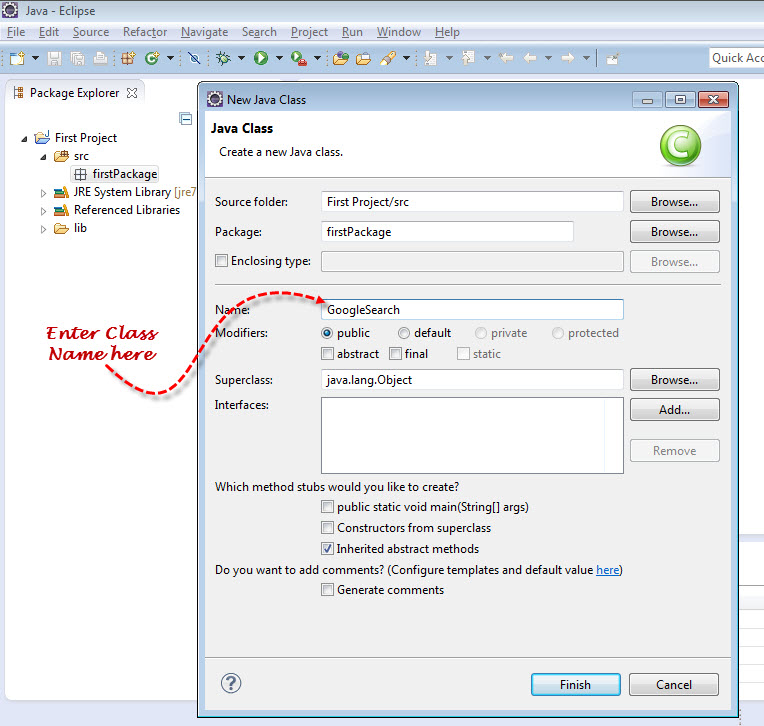
5) In New Java Class dialog box enter class name in Name text box as “GoogleSearch” shown in below screenshot:
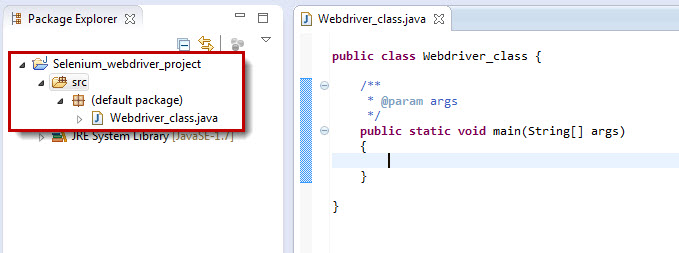
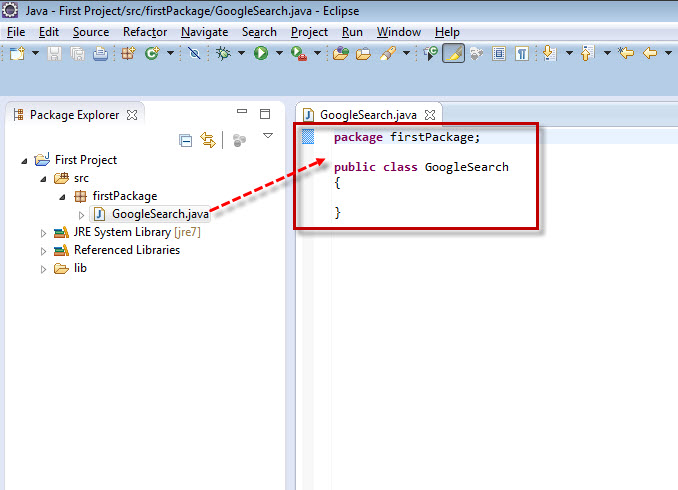
6) Once you created the “GoogleSearch” class, ensure that it is added under “firstPackage” folder same as below:
6) Now copy the Java/Junit4/WebDriver format converted code to from the previously recorded in Selenium IDE Source tab (Step A4).
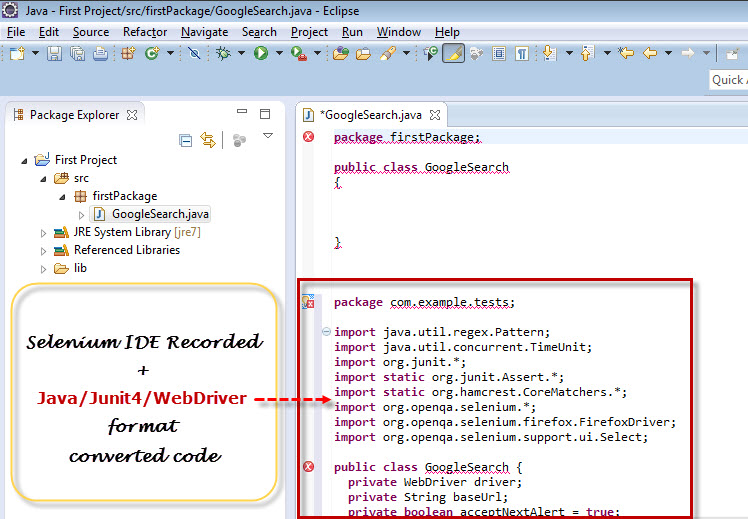
Without deleting existing code paste the above recorded in Selenium IDE copied code below as shown below:
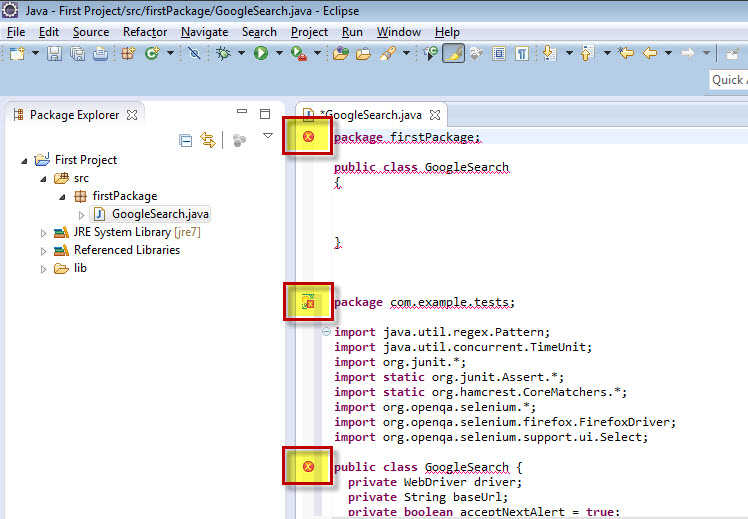
7) Upon pasting the code you will display some errors in the eclipse, don’t worry in next few steps we are resolving the all errors:
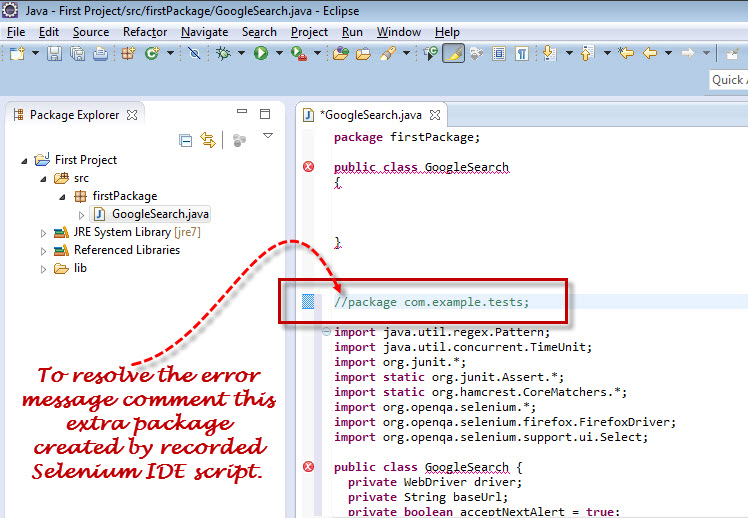
8) Now in the code you experience that there are two packages, first is “package firstPackage;” & second is the “package com.example.tests;”.
The Class is allow to declare only one package but the copied code is added new package. So copied package is not present in the Eclipse IDE, so let’s comment out the package name “package com.example.tests;”.
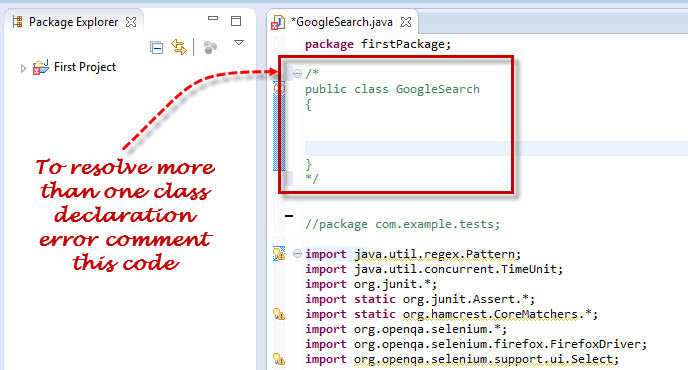
9) Once you resolve the more than one class declaration error then you will observe few warning messages as shown below:
D. Remove the warning messages
1) We can see there are three warning messages shown in the below screen shot. To remove these warning messages, remove or comment the warning message lines.
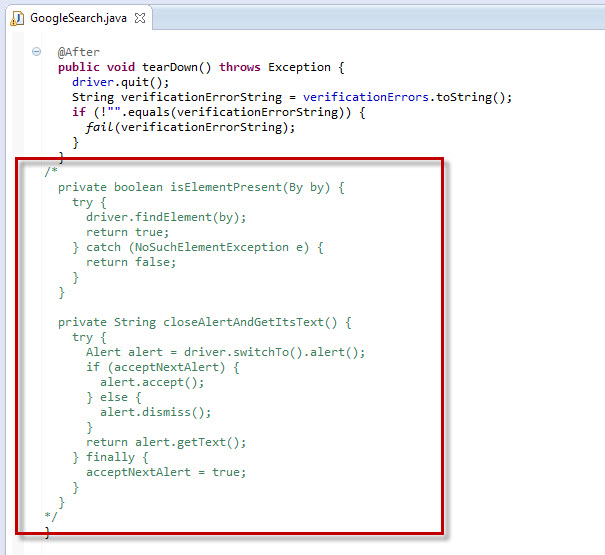
2) Two methods called isElementPresent & closeAlertAndGetItsText methods are never used locally, so let’s comment out these two method sections:
3) One more warning message will get displayed once you commenting unwanted methods:
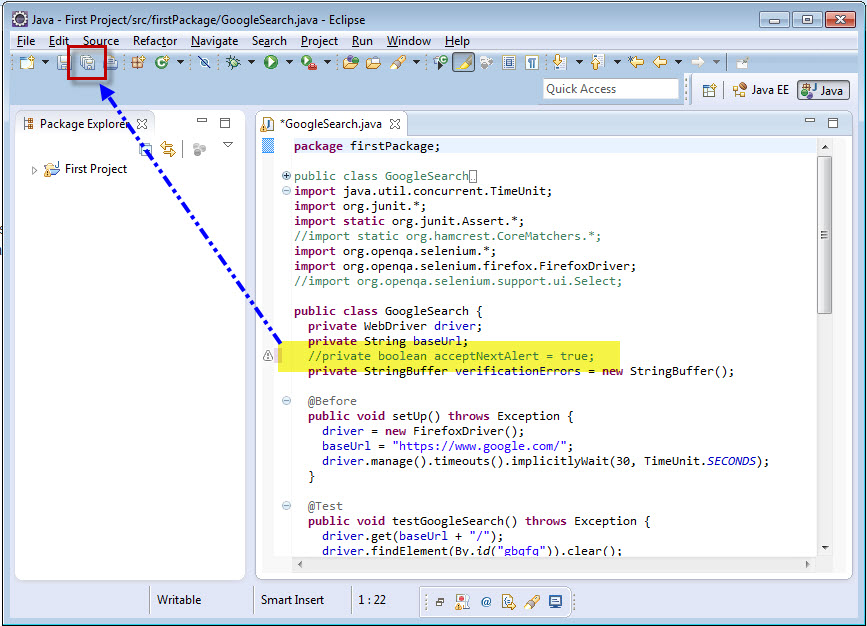
4) To resolve this problem comment out this line as this is never require while executing the code & click on Save All button shown below:
Download Code – Below is the final converted code from recorded Selenium IDE code. You can also copy below code & use directly.
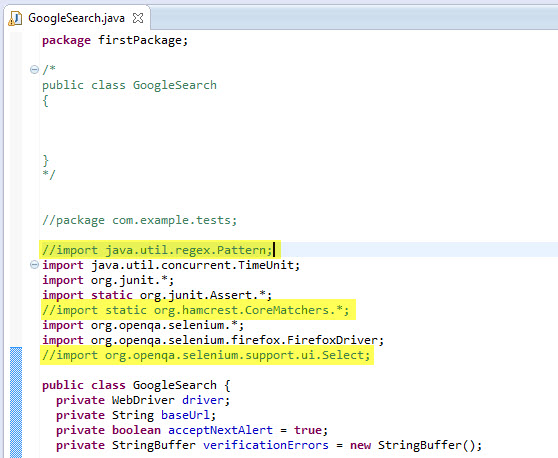
package firstPackage;

//import java.util.regex.Pattern;
import java.util.concurrent.TimeUnit;
import org.junit.*;
import static org.junit.Assert.*;
//import static org.hamcrest.CoreMatchers.*;
import org.openqa.selenium.*;
import org.openqa.selenium.firefox.FirefoxDriver;
//import org.openqa.selenium.support.ui.Select;

public class GoogleSearch {
  private WebDriver driver;
  private String baseUrl;
  //private boolean acceptNextAlert = true;
  private StringBuffer verificationErrors = new StringBuffer();

  @Before
  public void setUp() throws Exception {
    driver = new FirefoxDriver();
    baseUrl = "https://www.google.com/";
    driver.manage().timeouts().implicitlyWait(30, TimeUnit.SECONDS);
  }

  @Test
  public void testGoogleSearch() throws Exception {
    driver.get(baseUrl + "/");
    driver.findElement(By.id("gbqfq")).clear();
    driver.findElement(By.id("gbqfq")).sendKeys("Google");
    driver.findElement(By.id("gbqfb")).click();
  }

  @After
  public void tearDown() throws Exception {
    driver.quit();
    String verificationErrorString = verificationErrors.toString();
    if (!"".equals(verificationErrorString)) {
      fail(verificationErrorString);
    }
  }
/*
  private boolean isElementPresent(By by) {
    try {
      driver.findElement(by);
      return true;
    } catch (NoSuchElementException e) {
      return false;
    }
  }

  private String closeAlertAndGetItsText() {
    try {
      Alert alert = driver.switchTo().alert();
      if (acceptNextAlert) {
        alert.accept();
      } else {
        alert.dismiss();
      }
      return alert.getText();
    } finally {
      acceptNextAlert = true;
    }
  }
  */
}
Here we have completed updating the Selenium WebDriver code in Eclipse. Before executing the script please make sure that Firefox browser is installed in your machine as we have used Firefox browser libraries. When you click on Run icon (Ctrl+F11) then your Selenium WebDriver code will be executed successfully.
Conclusion:
1) We have recorded a Test case using in Selenium IDE recording feature.
2) “Enable Experimental Features” from Selenium IDE options & converted generated HTML code to JUnit 4/Java/WebDriver format.
3) In Eclipse, created “firstPackage” & Class under Selenium WebDriver project & pasted above automated generated code in class.
4) One by one resolved all error & warning messages observed in code.
Introduction to JUnit Annotations - Learn JUnit annotations used for your Selenium WebDriver automation
In previous article we have covered on
Start Selenium WebDriver Test Script on your own – Selenium Tutorial. I have used “@Test” annotation in the script, one of our reader ask in comments about “what is use of annotaions & why we added @Test annotation”. So I have started writing this post to clear the concept of what is
JUnit Annotations & what are different JUnit annotations with meaning of each. Also what is different testing framework used in Selenium WebDriver automation other than JUnit.
What is JUnit Annotations?
JUnit is a unit testing framework for the Java programming language. JUnit has been important in the development of test-driven development. To execute Selenium WebDriver testing using JUnit we have to add JUnit annotations in your test.
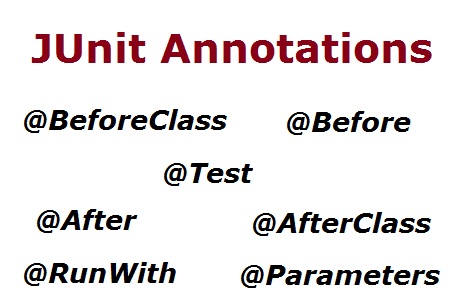
Different JUnit Annotations:
We are using following most commonly used five annotations in our Selenium WebDriver test scripts:
- @Test
- @Before
- @After
- @BeforeClass
- @AfterClass
Test methods must be annotated by the @Test annotation. If the situation requires it, it is also possible to define a method to execute before or after of the test methods with the @Before or @After and @BeforeClass or @AfterClass annotations.
Let’s elaborate on these JUnit annotations here:
@Test
The annotation @Test identifies that a method is a test method. When it is mentioned as @Test before a test method, it tells JUnit framework that the following is a Test Method.
@Before
The @Before annotation is used to identify the method which is executed before executing the Test Method. This method can be used to set up the test environment.
@After
The @After annotation is method which is executed after executing the Test Method. This method can be used to do teardown i.e. deleting temporary data or setting up default values or cleaning up test environment etc.
@BeforeClass
The @BeforeClass method is used only once before start all tests. Basically this is used to perform time intensive activities, like connect to a database.
@AfterClass
The @AfterClass method is used only once after finish executing all tests. Basically this is used to perform clean-up activities, like disconnect from a database.
In upcoming article the we will use above listed JUnit annotations and create the Selenium WebDriver automation tests.
Different Testing Frameworks:
TestNG is a one of the more popular testing Framework used as alternative to JUnit testing Framework. It supports multiple advantages, powerful and unique features in the TestNG framework. As JUnit is comes with Eclipse so we don’t want to install separately. For TestNG testing framework we have to install this explicitly in Eclipse.
Many people’s are using JUnit testing Framework as it is come with Eclipse by default. It is simple & easy to use that why we have started with JUnit testing framework to execute Selenium WebDriver tests. Once time comes we will see how to install TestNG testing framework & how to execute test using this powerful framework.
In next Selenium Tutorial article, we are using above explained JUnit annotations and will explain “How to run a Selenium WebDriver Test with different JUnit Annotations” in this post. If you like this article then make sure to share it with your friends & please leave your questions/tips/suggestions in the comment section below and I’ll try to answer as many as I can.
How to use JUnit Annotations in Selenium WebDriver Automation Script
In our previous article we have learned basic
Introduction to JUnit Annotations used in your Selenium WebDriver Automation Test script. Now I want to give you brief idea about how to use these JUnit Annotations & what is actual use in the Selenium WebDriver code.
In Selenium WebDriver if you want to run test script using JUnit framework we have to add few JUnit Annotations in Selenium WebDriver Test script.
Below we are using few most commonly used JUnit annotations & execute our Selenium WebDriver Tests:
- @Before
- @Test
- @After
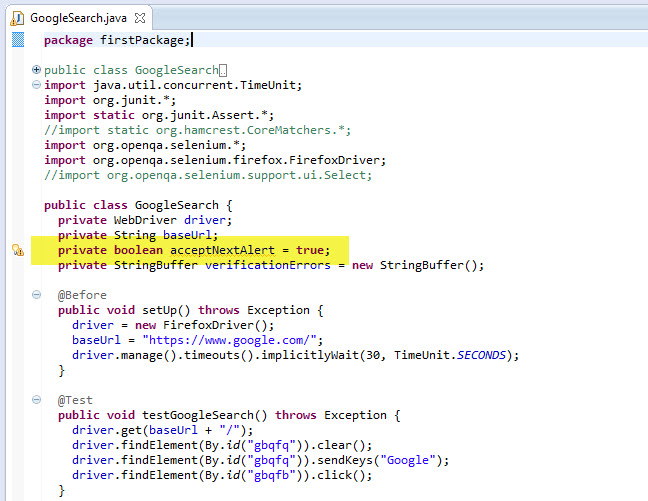
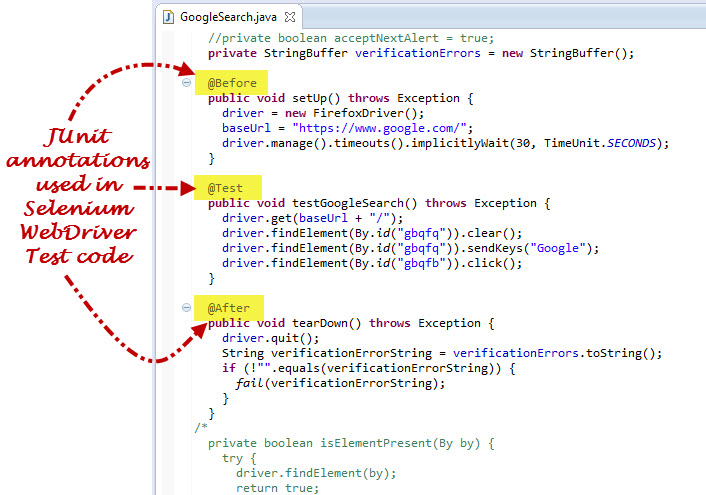
1) Once you open the above created Selenium WebDriver Test script and then check if have we used JUnit annotations in the code or not?
2) The highlighted part in above script is saying that we have used JUnit annotation in Selenium WebDriver code. In this script we have used @Before, @Test and @After annotations.
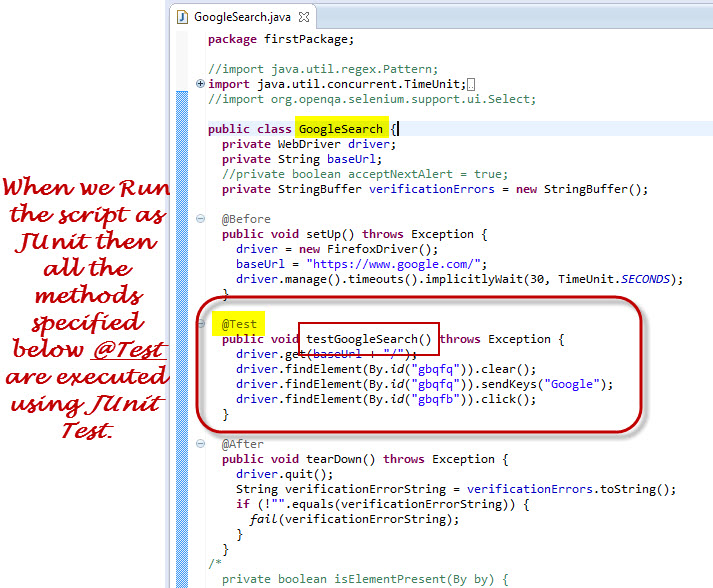
@Test
When we Run the script as JUnit then all the methods specified below @Test are executed using JUnit Test. As @Test JUnit annotation is specified before the testUntitled() method, this method will be executed when we run the “GoogleSearch” class using JUnit (i.e. Run As > JUnit Test)
@Before
All the methods are defined in the @Before are executed first & then method which are defined in @Test are executed. The primary use of this annotation is used to set up the test environment which is needed for executing the test. You can in below screen shot we have used setup() method in @Before.
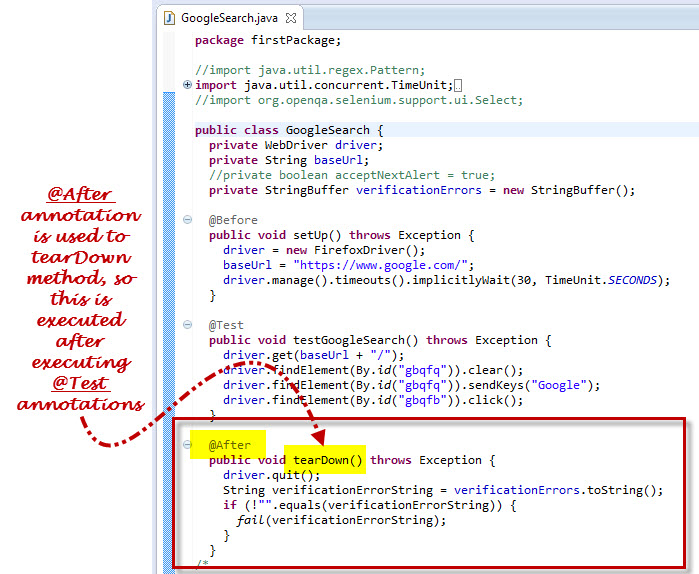
@After
All the methods are defined in the @Test annotation are executed first & then method which are defined in @After are executed. The primary use of this method is to do tear down i.e. deleting temporary data or setting up default values or cleaning up test environment etc.
Here @After annotation is specified before the ‘teardown()’ method. Hence this method will be executed by JUnit after executing all methods that are specified with @Test Annotation.
Run Selenium WebDriver Test Code without JUnit Annotaions:
Now let’s try to run Selenium WebDriver Test Code with commenting JUnit Annotaions & check if you are able execute test code as JUnit Test or not.
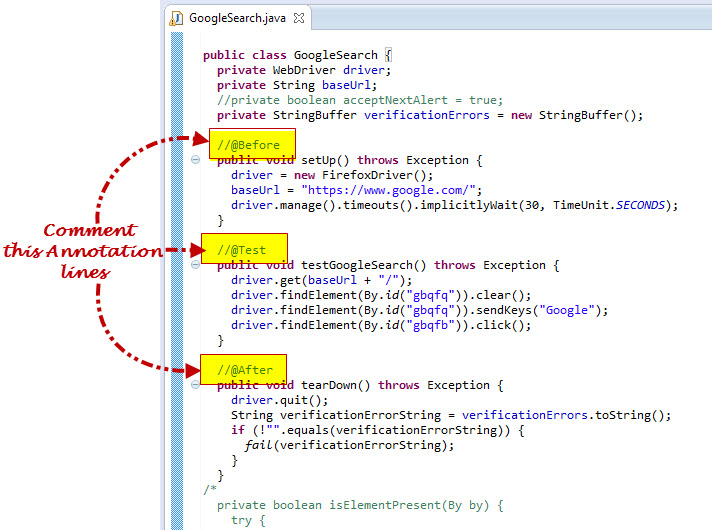
1. Comment all three Annotations line as shown in below screen shot. To comment line we have to add // before each line which we have to comment.
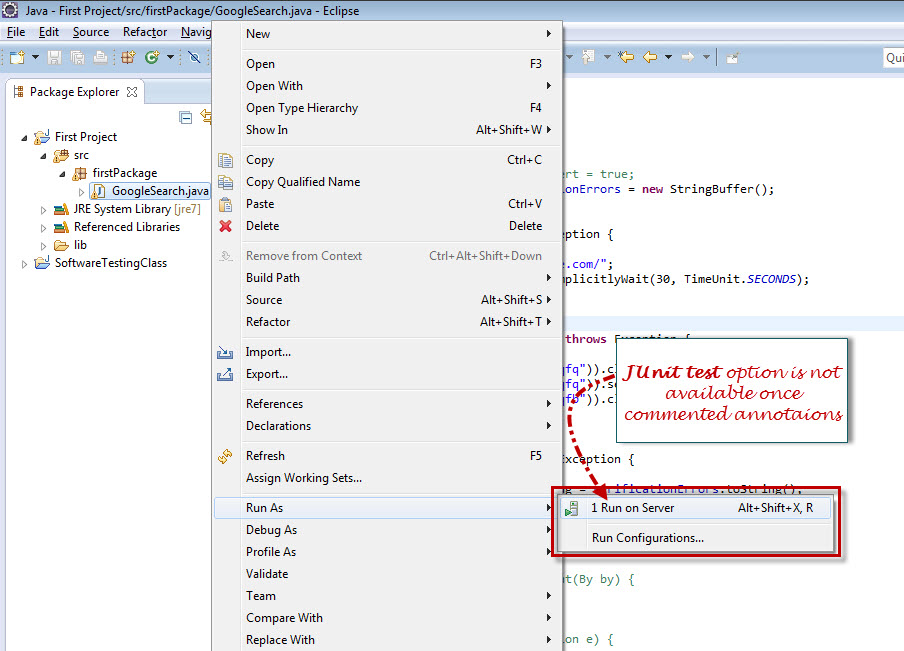
2. Run the Selenium WebDriver Test code with JUnit Test after commenting the annotations as shown below:
Now you understand if we are not using JUnit annotations in the Selenium WebDriver code then while running the code you cannot able to run the code as JUnit Test.
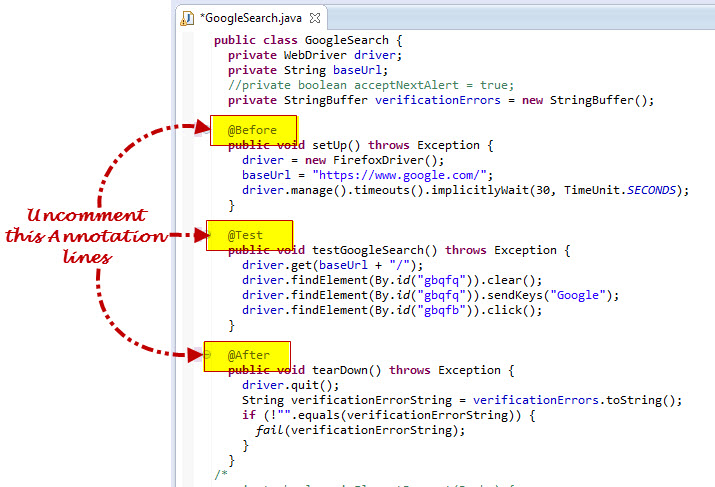
3. Now let’s uncomment annotations same as shown in below screen shot & check if you able to run the test using JUnit or not:
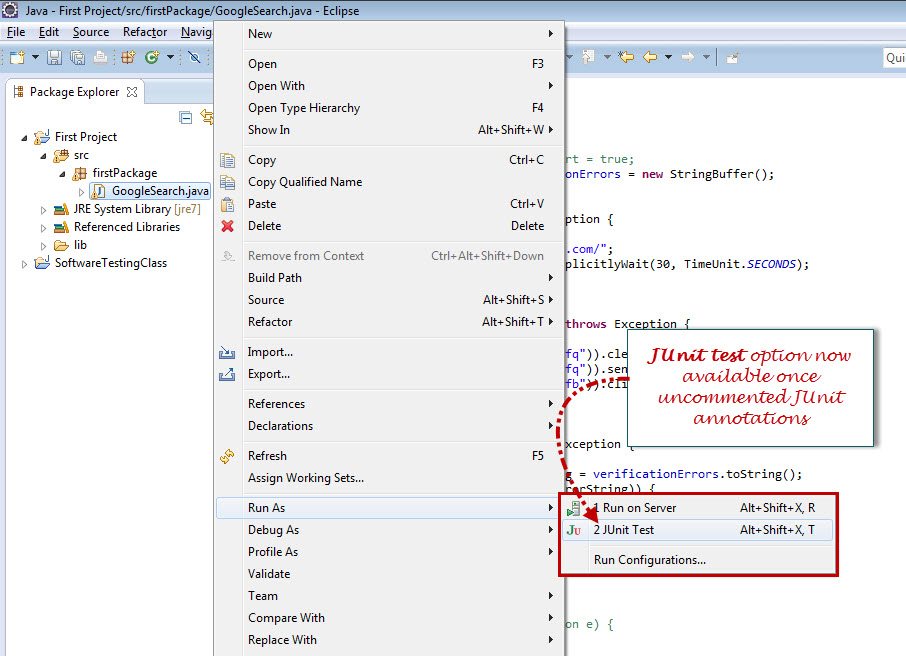
4. Have you notice that if we try to Run Selenium WebDriver code then the JUnit Test option is available as shown below:
So till now we have learned we can run the code using JUnit only if the JUnit annotations added in the code else Run As > JUnit Test option will not be available to Run the test.
Introduction of TestNG framework - Advantages of TestNG over Junit framework
In Selenium WebDriver training tutorial we have seen how to run Selenium scripts using JUnit framework. Until now we have execute selenium tests but we have not generated reports in JUnit. In this Selenium training article series we are introducing powerful new testing framework called TestNG. The TestNG framework means Next Generation testing framework, so we are seeing what all next generation features available in TestNG, also I will talk about advantages of TestNG over Junit. I will be discussing about different ways of using TestNG features in my coming articles.
I do not say that don’t use JUnit, but you should really consider using TestNG for your next project. Apparently TestNG is more complete and clean than JUnit.
What is TestNG?
TestNG is testing framework inspired from most popular JUnit framework used for the Java programming language. The TestNG framework is introduced to overcome the limitations of JUnit framework. Most of the automation users are using this framework because of its advantages & more supported features. Until we have executed selenium test script but not even generated test reports. So using this TestNG framework we will learn how to generate test reports.
Features of TestNG Framework:
TestNG supports many powerful features & it is easy to use. Let’s see what all new features are supported in new testing framework:
- Support for parameters.
- Supports dependent methods testing.
- Test configuration flexible.
- Supports powerful execution model.
- Embeds BeanShell for further flexibility.
- TestNG has a more elegant way of handling parameterized tests with the data-provider concept.
- For the same test class TestNG support for multiple instances.
- Extendibility of using different Tools and plug-ins like Eclipse, Maven, IDEA etc.
- Default JDK functions for runtime and logging (no dependencies).
- Supported different Annotations like @BeforeSuite, @AfterSuite, @BeforeClass, @AfterClass, @BeforeTest, @AfterTest, @BeforeGroups, @AfterGroups, @BeforeMethod, @AfterMethod, @DataProvider, @Factory, @Listeners, @Parameters, @Test.
TestNG supports annotations which are very helpful to guide test case executions. Similarly in JUnit, the TestNG annotations are always preceded by the ‘@’ symbol. It permit you do parallel execution of test cases & we can also skip the test cases effortlessly while executing test cases.
TestNG is specially designed to cover all types testing categories like Unit, Functional testing, Integration testing, End-to-end etc. Using TestNG framework allows us to generate test reports in both HTML and XML formats. Using ANT with TestNG, we can generate primitive Testng reports as well.
Advantages of TestNG over Junit:
- In TestNG Annotations are easy to understand over JUnit.
- In TestNG there is no constraint like you have to declare @BeforeClass and @AfterClass, which is present in JUnit.
- As method name constraint is present in JUnit, such method name constraint is not present in TestNG and you can specify any test method names.
- In TestNG enable you to grouping of test cases easily which is not possible in JUnit.
- TestNG supports following three 3 additional setUp/tearDown level:
@Before/AfterSuite, @Before/AfterTest and @Before/AfterGroup.
- TestNG do not require extend any class.
- TestNG allows us to define the dependent test cases each test case is independent to other test case.
- TestNG allows us to execute of test cases based on group. Let’s take a scenario where we have created two set of groups “Regression” & “Sanity”. If we want to execute the test cases under Sanity group then it is possible in TestNG framework.
- Parallel execution of Selenium test cases is possible in TestNG.